(Day 54) Task : Getting Started with AWS Lambda and API Gateway
Introduction
In the previous phases of my StudentHub Cloud Platform project, I worked with AWS networking, IAM, EC2, S3, CloudFront, ECR, ECS, and Route 53.
Until Phase 6, my primary focus was understanding cloud infrastructure and deploying the frontend.
However, StudentHub was still a static website. It could display information, but it did not have a backend to process requests or retrieve student records dynamically.
In Phase 7, I'm taking the next step: building a serverless backend using AWS Lambda and Amazon API Gateway, with Amazon DynamoDB planned for persistent data storage.
The objective is to connect the existing StudentHub frontend with backend services and eventually retrieve real student information from a database.
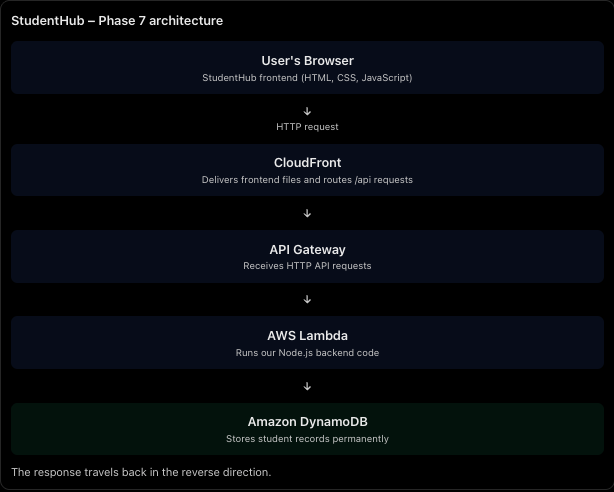
Understanding Serverless Architecture :
Serverless computing allows developers to run application code without managing the underlying servers. AWS takes care of infrastructure provisioning, availability, and execution.
For this phase, I'm using the following AWS services and technologies:
AWS Lambda: Executes backend JavaScript code.
Amazon API Gateway: Receives HTTP requests and connects them to Lambda.
Node.js: Runtime used to execute JavaScript in Lambda.
Amazon DynamoDB: Database planned for storing student records.
Amazon S3: Stores the frontend files.
Amazon CloudFront: Delivers the frontend website to users.
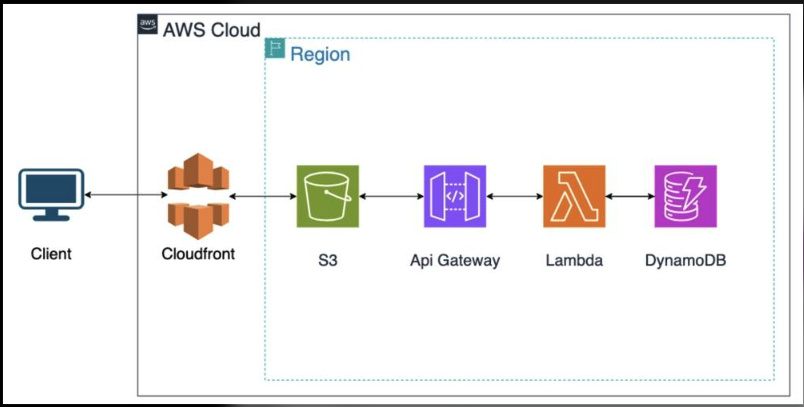
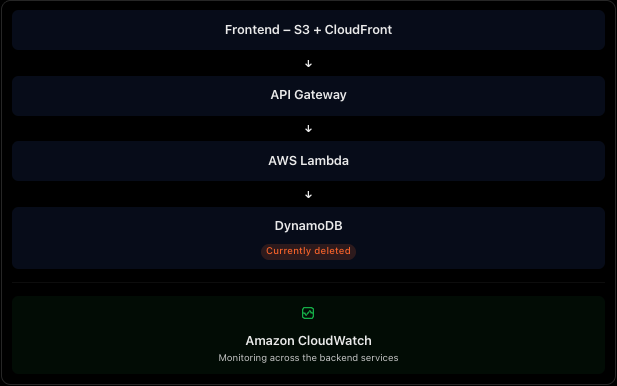
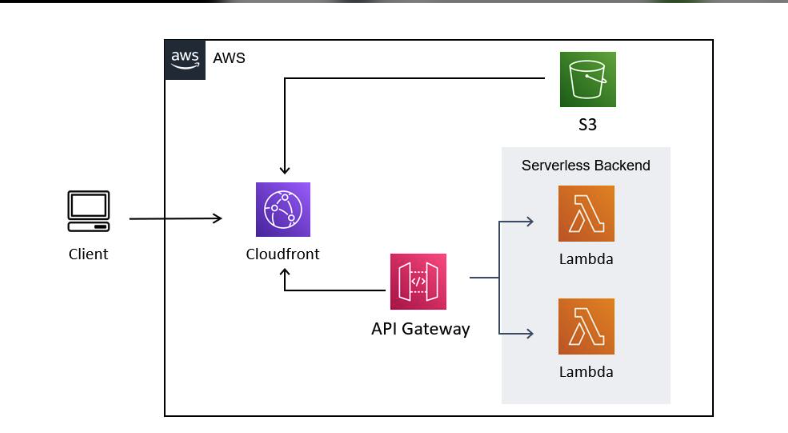
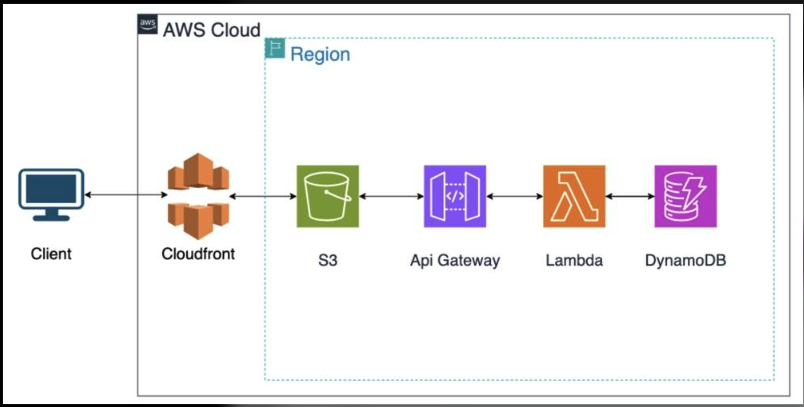
The overall application flow will be:
Frontend (Browser) → API Gateway → Lambda → DynamoDB
CloudFront delivers the frontend files stored in S3. The browser then sends API requests to API Gateway.
The response follows the reverse backend path:
DynamoDB → Lambda → API Gateway → Browser
At the current stage, DynamoDB has not yet been connected. Lambda is returning sample data to verify the backend integration.
Phase 7 Roadmap
Here's the complete roadmap for this phase and what I plan to implement.
Step : What I'll implement
7.1 Create an AWS Lambda function
7.2 Write and test JavaScript backend code
7.3 Create an HTTP API using API Gateway
7.4 Connect API Gateway with Lambda
7.5 Test the API using its Invoke URL
7.6 Connect the StudentHub frontend to the API
7.7 Integrate DynamoDB for persistent student records
7.8 Complete documentation, architecture diagram and final testing
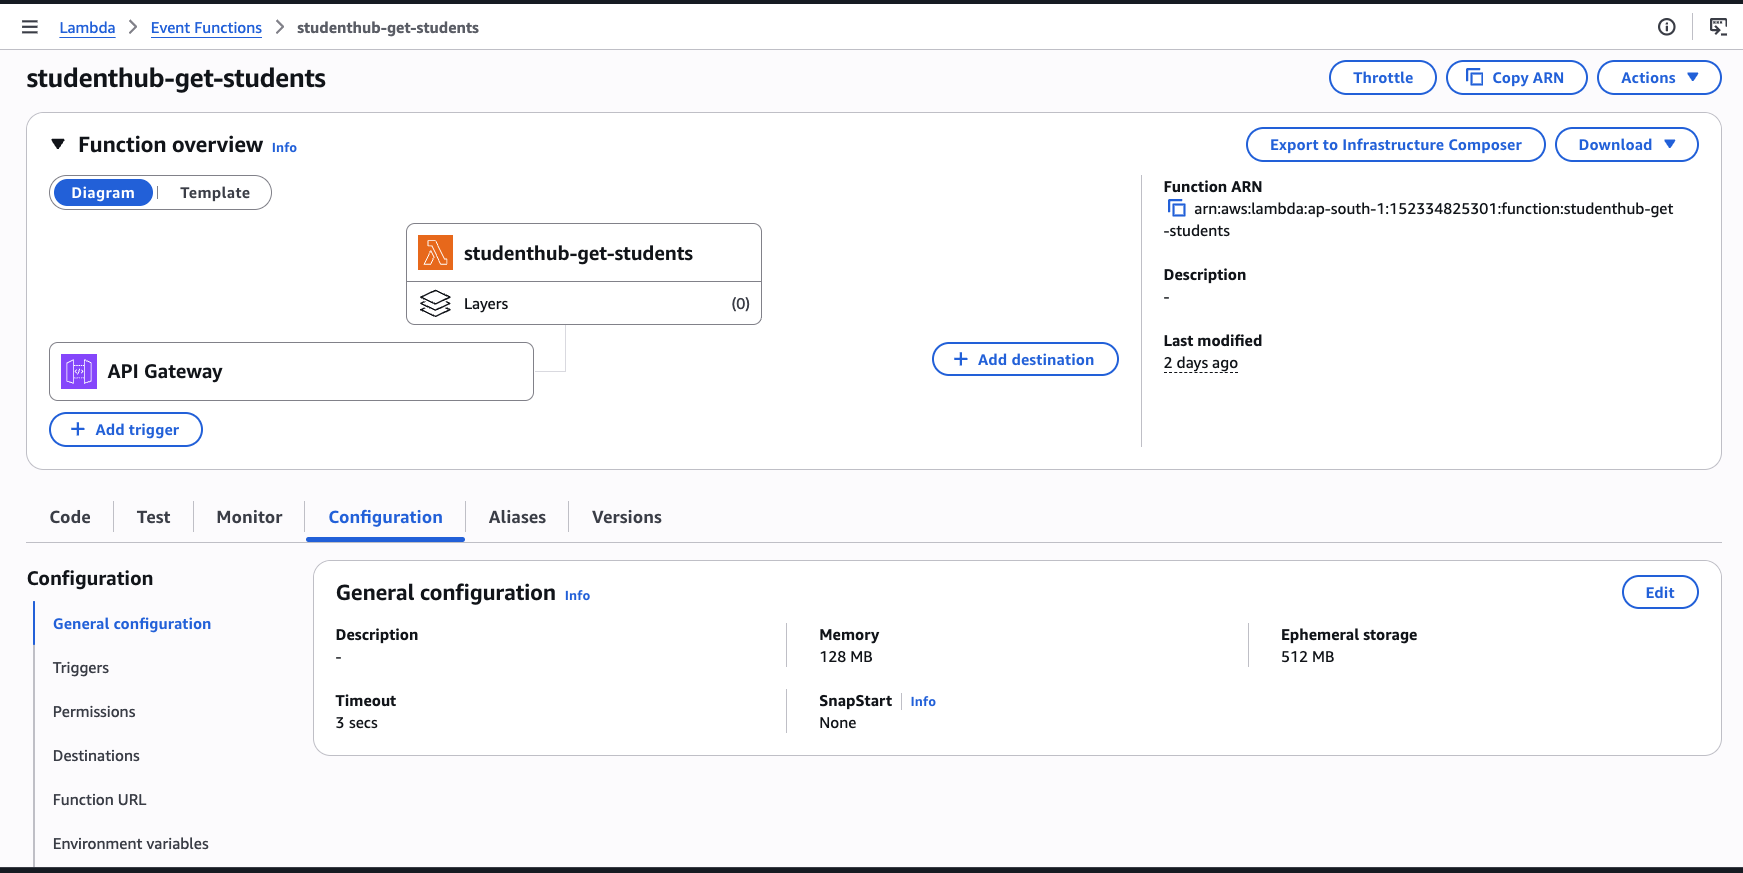
Step 7.1 – Creating an AWS Lambda Function :
The first step was creating a Lambda function named:
studenthub-get-students
Configuration:
| Setting | Value |
|---|---|
| Function name | studenthub-get-students |
| Runtime | Node.js |
| Architecture | x86_64 |
| Region | ap-south-1 (Mumbai) |
| Execution role | Basic Lambda execution permissions |
What is AWS Lambda?
AWS Lambda is a serverless compute service that executes code in response to events.
Unlike traditional server-based applications, we don't need to create or maintain an EC2 instance just to execute our backend function.
For StudentHub, Lambda will handle the backend logic whenever API Gateway receives a request.
4. Step 7.2 – Writing and Testing JavaScript Code
After creating the Lambda function, I moved to the code editor.
I used the index.mjs file to write my first backend JavaScript function.
Lambda function code :
export const handler = async (event) => {

    const students = [
        { id: 101, name: "Aditya", course: "Cloud Computing" },
        { id: 102, name: "Rahul", course: "Computer Science" },
        { id: 103, name: "Priya", course: "DevOps" }
    ];

    return {
        statusCode: 200,
        headers: {
            "Content-Type": "application/json"
        },
        body: JSON.stringify({
            message: "StudentHub backend is working!",
            students: students
        })
    };
};
Important concepts
handler: The function AWS Lambda executes.event: Contains information about the invocation.async: Allows asynchronous operations.statusCode: 200: Indicates that the request was successful.JSON.stringify(): Converts JavaScript data into JSON text.
I created a test event named studenthub-test using an empty JSON object {}.
The Lambda execution succeeded and returned the sample student records.
Important: These records are currently hardcoded inside the Lambda function. They are not stored in a database yet. DynamoDB integration will replace this temporary data source in Step 7.7.
5. Step 7.3 – Creating an HTTP API Using Amazon API Gateway
After successfully testing Lambda, the next step was to expose the backend through an HTTP endpoint.
For this, I used Amazon API Gateway.
What is API Gateway?
Amazon API Gateway acts as an entry point for HTTP requests.
It receives requests from clients, routes them to the configured backend integration, and returns the response.
I chose HTTP API instead of REST API because HTTP API provides the functionality required for this project with a simpler configuration and generally lower cost.
API configuration
| Setting | Value |
|---|---|
| API type | HTTP API |
| API name | studenthub-http-api |
| Integration | AWS Lambda |
| HTTP method | GET |
| Route | /api/students |
| Lambda function | studenthub-get-students |
| Payload format | 2.0 |
| Stage | $default |
| Auto-deploy | Enabled |
Understanding GET
GET is an HTTP method commonly used to retrieve information from a server.
For example:
GET /api/students
This request asks our backend to return the available student records.
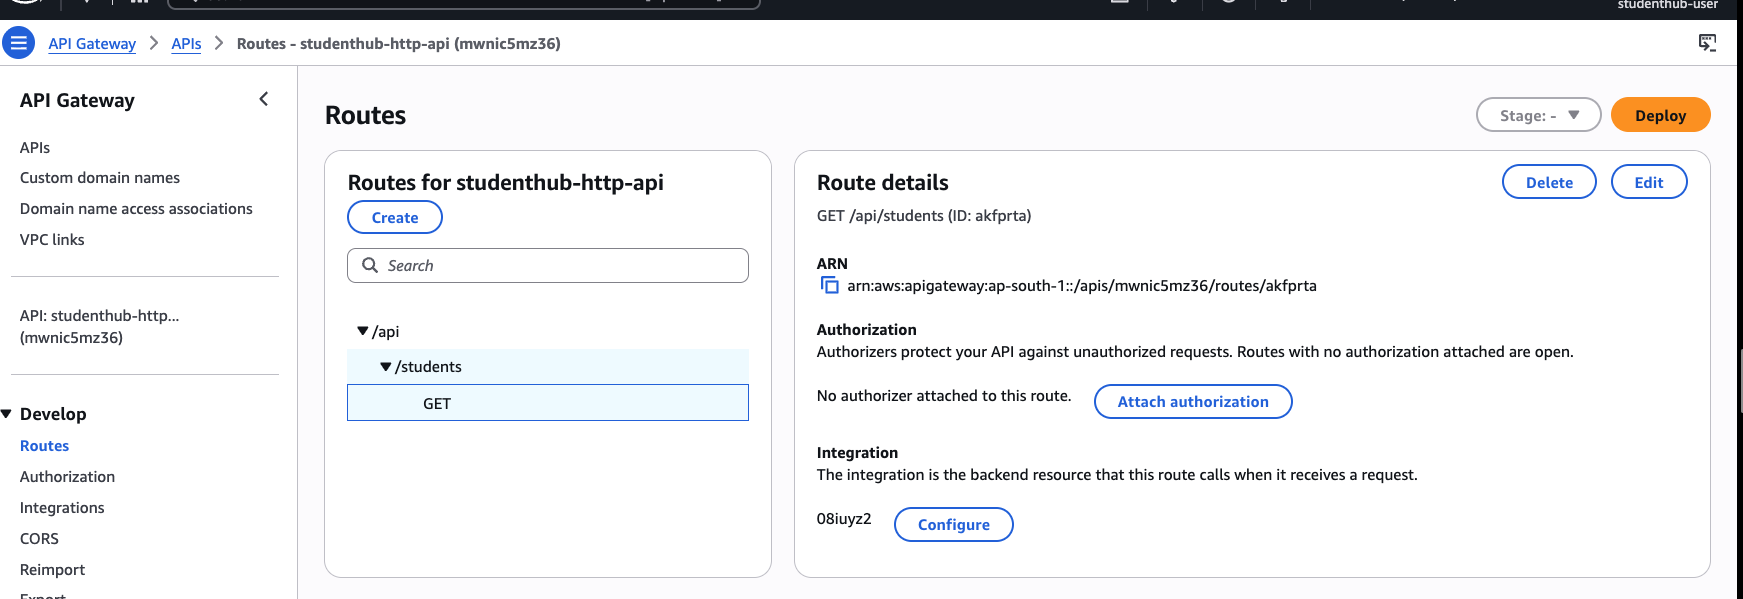
6. Step 7.4 – Connecting API Gateway to Lambda
Creating an API and a route is not enough. We also need to connect the route to the Lambda function.
I configured the Lambda integration using:
studenthub-get-students
I also verified that API Gateway had permission to invoke the Lambda function through its resource-based permissions policy.
How does the integration work?
- A client sends a GET request.
- API Gateway receives the request.
- API Gateway invokes the Lambda function.
- Lambda executes its handler.
- Lambda prepares the JSON response.
- API Gateway returns the response to the client.This established communication between API Gateway and Lambda.
This established communication between API Gateway and Lambda.
7. Step 7.5 – Testing the API
After configuring the integration, I tested the API using its Invoke URL.
My endpoint was:
https://mwnic5mz36.execute-api.ap-south-1.amazonaws.com/api/students
Opening this URL in the browser returned the expected JSON response containing the three student records.
This confirmed that:
- API Gateway was receiving requests.
- The route was correctly configured.
- API Gateway could invoke Lambda.
- Lambda returned the expected JSON response.

8. Step 7.6 – Connecting the StudentHub Frontend to API Gateway
Now it was time to connect the backend with the existing StudentHub website.
The frontend was already hosted using Amazon S3 and CloudFront.
Its main files were:
index.htmlstyle.cssscript.js
I added a new Student Directory section to index.html with a View Students button with some styling and new js file.
HTML :
<!DOCTYPE html>
<html lang="en">
<head>
  <meta charset="UTF-8">
  <meta name="viewport" content="width=device-width, initial-scale=1.0">
  <title>StudentHub Cloud Platform</title>
  <link rel="stylesheet" href="style.css">
  <script src="script.js" defer></script>
</head>
<body>
  <main class="container">
    <p class="tag">AWS CLOUD PROJECT</p>

    <h1>Welcome to StudentHub</h1>

    <p>
      A cloud platform built while learning AWS,
      Linux and DevOps step by step.
    </p>

    <p class="status">Phase 4: S3 + CloudFront</p>

    <button id="details-button" type="button">
      Show Project Details
    </button>

    <section id="project-details" hidden>
      <h2>Project Details</h2>
      <p>Network: Amazon VPC</p>
      <p>Compute: Amazon EC2</p>
      <p>Static Website: Amazon S3 + CloudFront</p>
      <p>Next Step: Docker, Amazon ECR and Amazon ECS</p>
    </section>

    <!-- Student Directory -->
    <section id="students-section">
      <h2>Student Directory</h2>

      <button id="load-students-button" type="button">
        View Students
      </button>

      <p id="students-status"></p>

      <ul id="students-list"></ul>
    </section>

  </main>
</body>
</html>
CSS :
/* ==============================
   1. Global Styles
================================ */

* {
  box-sizing: border-box;
}

body {
  margin: 0;
  min-height: 100vh;
  display: grid;
  place-items: center;
  font-family: Arial, sans-serif;
  background: #f1f5f9;
  color: #172554;
}

/* ==============================
   2. Main Container
================================ */

.container {
  width: calc(100% - 32px);
  max-width: 750px;
  margin: 24px;
  padding: 48px;
  background: white;
  border-radius: 16px;
  box-shadow: 0 8px 30px rgba(0, 0, 0, 0.08);
}

/* ==============================
   3. Header Section
================================ */

.tag {
  color: #0369a1;
  font-weight: bold;
  letter-spacing: 2px;
}

h1 {
  font-size: 2.5rem;
  color: #172554;
}

.status {
  margin-top: 24px;
  font-weight: bold;
}

/* ==============================
   4. Project Details Button
================================ */

#details-button {
  margin-top: 12px;
  padding: 12px 20px;
  border: none;
  border-radius: 8px;
  background: #0369a1;
  color: white;
  font-size: 1rem;
  font-weight: bold;
  cursor: pointer;
  transition: background 0.2s ease;
}

#details-button:hover {
  background: #075985;
}

#details-button:focus-visible {
  outline: 3px solid #7dd3fc;
  outline-offset: 3px;
}

/* ==============================
   5. Project Details Section
================================ */

#project-details {
  margin-top: 24px;
  padding: 20px;
  border-left: 4px solid #0369a1;
  border-radius: 8px;
  background: #f1f5f9;
}

#project-details h2 {
  margin-top: 0;
  font-size: 1.4rem;
}

#project-details p {
  line-height: 1.6;
}

#project-details[hidden] {
  display: none;
}

/* ==============================
   6. Student Directory
================================ */

#students-section {
  margin-top: 28px;
  padding-top: 4px;
}

#students-section h2 {
  margin-bottom: 18px;
  color: #172554;
  font-size: 1.5rem;
}

/* View Students Button */

#load-students-button {
  padding: 12px 22px;
  border: none;
  border-radius: 8px;
  background: #0369a1;
  color: white;
  font-size: 1rem;
  font-weight: bold;
  cursor: pointer;
  transition: background 0.2s ease;
}

#load-students-button:hover {
  background: #075985;
}

#load-students-button:focus-visible {
  outline: 3px solid #7dd3fc;
  outline-offset: 3px;
}

/* API Status Message */

#students-status {
  margin-top: 18px;
  font-size: 0.95rem;
  font-weight: 600;
  color: #166534;
}

/* Student Cards */

#students-list {
  list-style: none;
  padding: 0;
  margin-top: 18px;
  display: grid;
  grid-template-columns: repeat(auto-fit, minmax(220px, 1fr));
  gap: 14px;
}

#students-list li {
  padding: 18px;
  border: 1px solid #dce5ef;
  border-radius: 10px;
  background: #f1f5f9;
  color: #172554;
  font-size: 0.95rem;
  line-height: 1.7;
  transition: transform 0.2s ease, box-shadow 0.2s ease;
}

#students-list li:hover {
  transform: translateY(-3px);
  box-shadow: 0 5px 15px rgba(0, 0, 0, 0.08);
}

/* ==============================
   7. Responsive Design
================================ */

@media (max-width: 600px) {
  .container {
    padding: 28px 22px;
  }

  h1 {
    font-size: 2rem;
  }

  #students-list {
    grid-template-columns: 1fr;
  }
}
JS :
// 1. Existing Project Details functionality

const detailsButton = document.getElementById("details-button");
const projectDetails = document.getElementById("project-details");

detailsButton.addEventListener("click", function () {
  if (projectDetails.hidden) {
    projectDetails.hidden = false;
    detailsButton.textContent = "Hide Project Details";
  } else {
    projectDetails.hidden = true;
    detailsButton.textContent = "Show Project Details";
  }
});


// 2. StudentHub API integration

const loadStudentsButton = document.getElementById("load-students-button");
const studentsStatus = document.getElementById("students-status");
const studentsList = document.getElementById("students-list");

const API_URL = "https://mwnic5mz36.execute-api.ap-south-1.amazonaws.com/api/students";

loadStudentsButton.addEventListener("click", async function () {
  studentsStatus.textContent = "Loading students...";
  studentsList.innerHTML = "";

  try {
    // Send GET request to API Gateway
    const response = await fetch(API_URL);

    // Check whether the request was successful
    if (!response.ok) {
      throw new Error("Failed to fetch student records");
    }

    // Convert JSON response into JavaScript data
    const data = await response.json();

    // Display success message
    studentsStatus.textContent = data.message;

    // Display student records
    data.students.forEach(function (student) {
      const listItem = document.createElement("li");

      listItem.textContent =
        `ID: ${student.id} | Name: ${student.name} | Course: ${student.course}`;

      studentsList.appendChild(listItem);
    });

  } catch (error) {
    studentsStatus.textContent = "Unable to load students. Please try again.";
    console.error("API Error:", error);
  }
});
Understanding CORS While connecting the frontend and backend, I also learned about CORS:
CORS stands for Cross-Origin Resource Sharing.
Our frontend and backend have different origins:
- Frontend: CloudFront distribution.
- Backend: API Gateway endpoint. Browsers restrict cross-origin requests unless the backend allows them.
To enable communication, I configured CORS in API Gateway.
The configuration included:
| Setting | Value |
|---|---|
| Allowed origins | CloudFront domain and local development origin |
| Allowed methods | GET, OPTIONS |
| Allowed headers | Content-Type |
| Max age | 300 seconds |
| Credentials | Disabled |
Local frontend testing
Before deploying the updated files, I tested the website locally using VS Code Live Server.
Local development URL:
http://127.0.0.1:5500/index.html
The frontend successfully communicated with API Gateway and displayed the three sample student records.
I also improved the Student Directory styling using CSS, replacing the basic bullet list with responsive student cards.
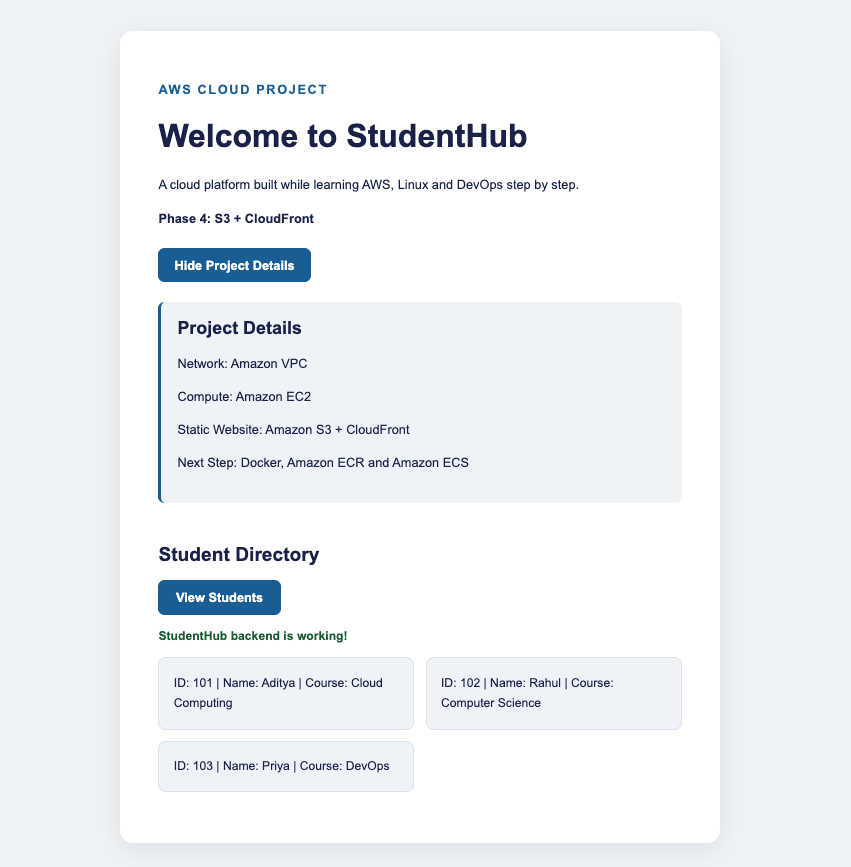
Deploying the updated frontend After local testing, I uploaded the updated files to the existing S3 bucket:
- index.html
- style.css
- script.js Since CloudFront caches files at edge locations, I also learned about CloudFront invalidation.
When files are updated in S3, CloudFront may continue serving previously cached copies.
Invalidation removes specified cached objects so that subsequent requests can retrieve the updated files from S3.
I created an invalidation for
/index.html
/style.css
/script.js
Current status: The local frontend-to-API integration works, and the API endpoint works independently. However, the deployed CloudFront website is still undergoing browser-to-API troubleshooting.
I am investigating this before declaring the deployed integration complete.
9. Step 7.7 – Integrating Amazon DynamoDB (Upcoming)
So far, our Lambda function returns hardcoded student records.
This is useful for testing, but it is not a practical way to maintain application data.
The next step is to introduce Amazon DynamoDB. What is DynamoDB? Amazon DynamoDB is a fully managed NoSQL database service that stores data in tables.
For StudentHub, we will use it to store student records persistently. Planned implementation
- Create a DynamoDB table named StudentHubStudents.
- Understand partition keys and primary keys.
- Add student records to the table.
- Configure the Lambda execution role with the required DynamoDB permissions.
- Modify the Lambda function to retrieve student records from DynamoDB.
- Test the Lambda function with actual database records.
- Verify that API Gateway returns the records retrieved from DynamoDB.
- Test the complete frontend-to-database flow. The important change will be:
Before: Lambda returns hardcoded data.
After: Lambda retrieves student records from DynamoDB and returns them through API Gateway.
This will make StudentHub a more realistic serverless application.
10. Step 7.8 – Final Testing and Documentation (Upcoming)
After DynamoDB integration, I will complete the phase by documenting and testing the full architecture.
The final checks will include:
- Verify the DynamoDB table and student records.
- Verify Lambda database permissions.
- Test the API endpoint.
- Test frontend-to-backend communication.
- Verify the deployed website through CloudFront.
- Check browser errors and CORS configuration.
- Review the final architecture diagram.
- Document the AWS services, configurations and implementation steps.
- Review AWS resources to avoid unnecessary charges.
11. What I Have Learned So Far Through the completed steps, I have learned:
Serverless computing: Running backend code without managing servers.
AWS Lambda: Creating and testing backend functions.
Node.js: Executing JavaScript outside the browser.
Lambda handlers and events: Understanding how Lambda receives and processes invocations.
Amazon API Gateway: Exposing backend functionality through HTTP endpoints.
HTTP methods: Understanding how GET requests retrieve information.
JSON: Transferring structured data between frontend and backend.
JavaScript fetch(): Making API requests from browser JavaScript.
CORS: Controlling cross-origin communication.
CloudFront caching: Understanding how cached files affect frontend deployments.
Conclusion
Phase 7 is helping me move beyond deploying cloud infrastructure and understand how applications actually communicate with backend services.
I started with a simple Lambda function, exposed it through API Gateway, tested the endpoint, and connected it to my existing StudentHub frontend.
The next major milestone is integrating DynamoDB so that student records are stored persistently instead of being hardcoded inside Lambda.
This project is helping me understand how individual AWS services work together to build a serverless application.
Building StudentHub one phase at a time!
#AWS #AmazonWebServices #AWSLambda #APIGateway #DynamoDB #Serverless #CloudComputing #DevOps #CloudProjects #LearningInPublic
About the author
- DevOps Enthusiast | Python | Chef | Docker | GitHub | Linux | Shell Scripting | CI/CD & Cloud Learner | AWS
Comments
Join the discussionNo comments yet. Be the first to comment.